Home Repair and Maintenance

  • 🔨 How to Find a Wall Stud Without Turning Your Wall Into Swiss Cheese

    🔨 How to Find a Wall Stud Without Turning Your Wall Into Swiss Cheese

    You bought the shelf.

    You measured the wall.

    You found the drill.

    Now comes the ancient homeowner ritual of standing in front of drywall, knocking on it with one knuckle and pretending you can hear lumber.

    “Yep. Definitely sounds stud-ish.”

    Five minutes later, you’ve drilled three holes and discovered absolutely nothing except regret.

    Finding a wall stud isn’t difficult once you understand what you’re actually looking for and how to verify it. More importantly, you don’t need to pepper the wall with exploratory holes until you get lucky.

    Here’s how to do it.


    🧱 First: What Exactly Are You Looking For?

    Behind most drywall walls is a framework of vertical pieces of lumber or metal called studs.

    The drywall is attached to that framing, and the framing gives you a much stronger place to attach heavier objects than drywall alone.

    In many conventionally framed homes, studs are spaced 16 inches on center. That means the distance from the center of one stud to the center of the next is 16 inches.

    But don’t treat 16 inches as a universal law.

    You can encounter 24-inch spacing, different layouts, extra framing, blocking, corners, openings and other construction details.

    So measuring 16 inches from something is a clue.

    It isn’t proof.


    🔎 Method 1: Use a Stud Finder

    We’ll start with the obvious one because there’s a reason these things exist.

    An electronic stud finder is usually the quickest way to locate framing behind drywall.

    But there’s a trick:

    Don’t just slide it across the wall until it beeps and immediately start drilling.

    Different stud finders work differently, so follow the calibration and scanning instructions for yours.

    Then make multiple passes.

    Try this:

    Slowly scan across the suspected stud.

    Mark where the finder indicates one edge.

    Continue past it.

    Then scan back from the opposite direction and mark the other edge.

    If the readings are consistent, the center between those marks should give you a much better estimate of the stud’s center than a single beep.

    Why scan from both directions?

    Because you’re trying to locate a piece of framing with width, not a magical vertical line hidden inside your wall.

    Finding both edges gives you another piece of evidence that you’ve actually found framing.

    If you’re putting together a basic DIY tool kit, I covered several stud finders, levels and laser options in “You Don’t Need a Workshop: 6 Tools That Make Basic DIY Much Easier.”

    🔨 You Don’t Need a Workshop: 6 Tools That Make Basic DIY Much Easier


    🧲 Method 2: Grab a Strong Magnet

    This is one of my favorite low-tech methods.

    You’re not actually trying to find the wooden stud with the magnet.

    You’re looking for the metal fasteners holding the drywall to it.

    Slowly move a reasonably strong magnet across the wall.

    When it grabs onto something beneath the surface, you may have located a drywall screw or nail.

    Find another magnetic point vertically above or below the first.

    If you find multiple fasteners running along the same vertical line, that’s pretty compelling evidence that framing is behind them.

    Dad Approved tip:

    A single magnetic hit tells you:

    There’s metal here.

    Several vertically aligned hits tell you:

    Now we’re getting somewhere.

    That’s the difference between finding a clue and verifying the clue.


    👊 Method 3: The Knock Test

    Yes, the thing we’ve all done actually has some value.

    Knock gently across the wall while moving horizontally.

    Areas between studs can produce a more hollow sound.

    As you move over framing, the sound may become more solid.

    The problem?

    It’s subjective.

    Wall thickness, insulation, construction and your apparently questionable career as a human sonar system can all affect what you hear.

    So I wouldn’t use knocking as my only method before mounting something heavy.

    Use it to narrow down an area.

    Then verify with another method.


    🔌 Method 4: Look at Outlets and Switches

    Electrical boxes can provide another clue.

    Boxes are commonly secured to framing or otherwise supported within the wall system, so an outlet or switch can help you determine where framing might be located.

    But there’s a catch.

    You cannot simply look at an outlet and declare:

    “Stud’s on the left.”

    Construction methods vary, and old-work/remodel boxes can be installed directly into drywall without being fastened to a stud.

    So again:

    Clue, not proof.

    Use the outlet to narrow your search, then verify the stud with a finder, magnet or another method.

    And don’t start drilling beside an electrical box simply because you’re confident you’ve found framing.

    Which brings us to the important part.


    ⚡ Finding a Stud Doesn’t Mean It’s Safe to Drill Anywhere Along It

    This is where DIY gets more serious.

    Walls can contain:

    • Electrical wiring
    • Water lines
    • Drain and vent pipes
    • Gas lines
    • HVAC components
    • Metal protection plates
    • Blocking
    • Other utilities

    Finding wood behind drywall does not tell you what might pass through that wood.

    If you encounter unexpected resistance while drilling, don’t respond by applying more pressure and discovering what it was the exciting way.

    Stop and investigate.

    Metal protective plates may be installed specifically to help prevent screws or nails from penetrating wiring or pipes where they pass through framing.

    A drill suddenly meeting metal is not the wall issuing you a challenge.


    📏 Method 5: Measure From a Stud You’ve Already Verified

    Once you’ve confidently located one stud, the rest of the wall becomes easier to investigate.

    Mark its center.

    Then measure horizontally in likely framing intervals, commonly 16 inches on center in many residential walls.

    That gives you predicted locations for neighboring studs.

    But here’s the important part:

    Verify them anyway.

    Doors, windows, corners and structural details can change the framing pattern.

    The tape measure gets you into the neighborhood.

    Your verification method finds the house.


    🚪 Method 6: Use Doors, Windows and Corners as Clues

    Wall openings require framing.

    Doors and windows therefore provide useful reference areas when you’re trying to understand how a wall might be constructed.

    Corners also require framing so adjoining wall surfaces can be supported.

    But framing around openings can be more complicated than a simple repeating row of studs.

    You can have additional studs, headers and other framing components.

    That means a door or window can tell you:

    “There’s probably framing around here.”

    It does not necessarily tell you:

    “Drill exactly 16 inches from this point.”

    There’s a recurring theme here.

    Home improvement gets much easier when you stop treating clues as guarantees.


    🤨 Why Does My Stud Finder Keep Giving Weird Readings?

    Because walls are messy.

    Your stud finder isn’t looking at a perfectly clean diagram from a construction textbook.

    Depending on the tool and wall, readings can potentially be affected by things such as:

    • Multiple layers of material
    • Different wall coverings
    • Dense materials
    • Metal
    • Wiring
    • Pipes
    • Moisture
    • Unusual framing
    • Improper calibration or scanning technique

    If you’re getting inconsistent readings, don’t immediately assume the stud finder is garbage.

    Reset.

    Move to another section.

    Calibrate according to its instructions.

    Scan slowly.

    Approach from both directions.

    Then compare the results with another method.

    A stud finder + magnet + measurement gives you much more information than repeatedly scanning the same mysterious spot and becoming increasingly angry at a handheld electronic device.


    🪛 Do You Actually Need to Hit a Stud?

    Not always.

    This is another homeowner misconception worth clearing up.

    If you’re mounting something relatively light, an appropriate drywall anchor may be all you need.

    For heavier loads, dynamic loads or installations where the manufacturer specifically calls for attachment to framing, finding the stud becomes much more important.

    The correct mounting method depends on:

    • What you’re hanging
    • Its weight
    • How the load acts on the fastener
    • The wall material
    • The anchor or fastener
    • The manufacturer’s installation requirements

    A little decorative frame and a giant wall-mounted cabinet aren’t remotely the same job.

    When in doubt, follow the mounting instructions for the specific item and hardware you’re using.


    🧰 The Dad Approved 3-Step Method

    You don’t need to memorize wall-framing diagrams every time somebody asks you to hang something.

    Remember three words:

    1. LOCATE

    Use a stud finder, magnet, measurements or physical clues to determine where framing probably is.

    2. VERIFY

    Use another pass, another direction or preferably another method.

    Stud finder says yes?

    Scan from the other direction.

    Magnet finds a fastener?

    Look for another vertically aligned fastener.

    Measurements predict another stud?

    Scan that location.

    3. DRILL

    Only after you’ve established a reasonable level of confidence in the location and considered what else could be inside the wall.

    Locate → Verify → Drill.

    Not:

    Guess → Drill → Spackle → Move shelf two inches → Repeat.


    🏠 One More Trick: Learn How Your Own House Is Built

    Once you’ve done a few projects, you’ll start recognizing patterns in your house.

    You may notice that certain walls consistently have studs 16 inches on center.

    You’ll learn how particular outlets are positioned.

    You’ll recognize which walls give your stud finder trouble.

    You’ll even accumulate little pencil marks hidden behind shelves and pictures that tell future-you exactly where framing is.

    That’s useful knowledge.

    Just don’t let familiarity turn into overconfidence.

    The wall you’ve drilled into twenty times isn’t necessarily constructed exactly like the next one.


    🔨 The Bottom Line

    You don’t need to randomly drill tiny holes across the wall to find a stud.

    Start with the easiest reliable method available, then verify what you found.

    An electronic stud finder is convenient.

    A magnet provides excellent supporting evidence by finding drywall fasteners.

    Measurements and wall features help predict where framing should be.

    Knocking can help narrow things down.

    But the strongest approach is usually combining clues rather than trusting one of them blindly.

    And if you’re building out your homeowner tool kit, check out my guide to 6 tools that make basic DIY much easier:

    🔨 You Don’t Need a Workshop: 6 Tools That Make Basic DIY Much Easier

    Because the objective isn’t merely finding the stud.

    It’s hanging the shelf once.

    Then walking away.

    Without having to find the spackle.


    Homeowner testing exposed wall wiring with a green electrical tester
    Don’t be this guy…please!
  • 🔧 Stop Saying “I’ll Fix It Later”: Cheap Gear for the Little Jobs Around the House

    🔧 Stop Saying “I’ll Fix It Later”: Cheap Gear for the Little Jobs Around the House

    #ad – As an Amazon Associate, Dad Approved earns from qualifying purchases.

    Every house has a list.

    Not an official list.

    Nobody wrote it down.

    It’s just a collection of little problems everyone has silently agreed to live with.

    The picture that’s slightly crooked.

    The rug that moves six inches every time somebody walks across it.

    The dark cabinet where you use your phone flashlight to find things.

    The shower drain that’s getting slower, but you’re pretending not to notice.

    The scratch on the furniture you’ve been meaning to fix since approximately the day after you bought it.

    None of these problems are particularly serious.

    That’s exactly why they never get fixed.

    So today we’re attacking the “I’ll get to it later” list.


    💡 1. Put a Light Where You Actually Need One

    Sale
    MCGOR 10inch Under Cabinet Lighting, 2 Pack Rechargeable Motion Sensor Light Indoor, 5 Levels Dimmable Magnetic Closet Lights, Wireless Under Counter Lights for Kitchen, Stairs White Light 10inch
    • Upgraded Motion Sensor Under Cabinet Lights: Setting the under cabinet lights on motion sensor mode, they auto-on when human motion is detected within 120°and 10ft in a dark or low light environment, and auto-off after about 20 seconds of no motion detected. No longer have to worry about tripping on the step in the dark trying to turn on the switch
    • Always-on Mode: The under counter lights for kitchen can be also be set to be always-on, or off. The always-on feature allows you use the motion sensor lights on daytime for a long time task. It can be used in reading, camping and as a flashlight
    • Upgraded Dimmable Closet Lights: The cabinet lights are bright and eye-protection, thanks to 40pcs energy-saving LEDs and a non-glare frosted cover. In addition, unlike fixed brightness of others’, our motion sensor light indoor has 5 levels of brightness. So the dimmable under cabinet lighting allows you to brighten them for task like meal preparation and dim them for a motion sensor night light without waking other people up at midnight
    • USB-C Rechargeable Under Cabinet Lights Wireless: These under cabinet lights built-in a 1800mAh rechargeable battery and can be easily recharged via type-C cable. Don’t worry about wiring, available outlets or battery replacement like other styles. One full charge can last up to 7-45 days on Motion Sensor Mode(depends on how often you use) and 8 hours on Always-on Mode at 100% brightness. Note that the USB wall adapter is not included
    • Easy Installation and Wide Usage: With built-in strong magnets, these closet lights are easy to install, no need for an electrician. It can be adsorbed directly on ironwork surfaces. Or use the included adhesive metal plates to stick on anywhere you want. That also means it’s easy to take off and put back on when it needs a charge. Great under counter lights for kitchen, clooset, cupboard, pantry, basement, stairs, hallway, bookshelf, etc

    There are places in every house where somebody clearly forgot lighting was going to be necessary.

    Closets.

    Pantries.

    Under cabinets.

    Stairways.

    Storage areas.

    The MCGOR Rechargeable Motion-Sensor Lights are an easy way to add light without turning a small project into an electrical project.

    Check out the Rechargeable Motion-Sensor Lights →

    They’re rechargeable and can automatically illuminate when motion is detected, making them useful in places where you don’t necessarily want a light running constantly.

    Dad Approved move:

    Don’t immediately buy enough to illuminate the entire house.

    Start with the one dark spot that annoys you constantly.

    If it solves the problem, then expand.

    Because there’s a fine line between useful motion lighting and your kitchen cabinets welcoming you like an airport runway.

    See the Motion-Sensor Lights on Amazon →


    🚿 2. Deal With the Hair Before It Becomes a Plumbing Project

    Sale
    TubShroom Ultra Revolutionary Bath Tub Drain Protector Hair Catcher/Strainer/Snare Stainless Steel, Single Pack Stainless Single
    • Package Contents: This pack includes one (1) Stainless Steel TubShroom Ultra plus two (2) 1. 5″ to 1. 75″ adapters, one (1) 1. 25″ adapter for smaller drains, and one (1) 2″ adapter for larger drains. Truly, an epic drain protector.
    • A Revolution in Drain Protection: Unlike regular plugs that go over the drain, TubShroom fits inside, neatly collecting hair around it. When it’s time to cleanup, simply wipe TubShroom off and GO! No harsh chemicals, no more tangled messes.
    • No More Clogged Drains: Our bathtub drain strainer fits any standard tub drain and is to catch every hair, every time. TubShroom is designed to effortlessly catch any type of human or pet hair without disrupting the flow of water.
    • Save Money and the Environment: A single plumber visit can cost hundreds. Drain snakes and liquid drain cleaners are a hassle to use and aren’t always effective—not to mention the toll they take on the environment and on your pipes.
    • Award-winning and Patented Design: TubShroom has been honored as a 2018 KBB Product Innovator Award Winner in the home and bath category. Over three million drains are now protected by the Shroom patented design.

    A shower drain usually doesn’t clog all at once.

    It gives you warnings.

    Water drains a little slower.

    Then a little slower.

    Eventually you’re standing ankle-deep in water thinking:

    “Huh. That’s probably not good.”

    The ShowerShroom Ultra Drain Protector takes a preventative approach.

    Check out the ShowerShroom Ultra →

    It sits in the shower drain and catches hair before that hair travels farther into the plumbing.

    Then you remove the collected hair and clean the catcher.

    Not glamorous.

    Not exciting.

    But neither is dismantling plumbing because six months of hair has constructed a subterranean beaver dam.

    Dad Approved verdict:

    This is exactly the kind of product that fits this article.

    A small purchase designed to prevent a considerably more irritating job later.

    See the ShowerShroom Ultra on Amazon →


    🖼️ 3. Hang the Picture Once

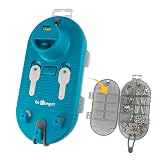
    Original Go Hang It!® Pro All-in-One Picture Hanging Kit, Level & Hardware
    • THE ORIGINAL GO HANG IT! Easy picture hanging with zero measuring required. Our patented positioning system marks your nail holes accurately on the first try, so you’re not guessing, patching drywall, or rehanging crooked frames. Works with sawtooth, wire, and D-ring picture hangers.
    • INNOVATIVE MAGNETIC KEY SYSTEM. Our patented MagneKeys stay securely in the tool until you need them. When you’re ready to hang, insert a key into the hanger on the back of your frame, hold the frame where you want it on the wall, and press. The key marks exactly where your nail goes. Works with our single-notch precision hangers, sawtooth hangers, and D-hooks. For wire hanger frames, built-in positioning hooks let you mark your nail placement just as easily.
    • BUILT-IN LEVEL FOR A STRAIGHT HANG. No need to dig through your toolbox for a separate level. The detachable level is built right in, so you can make sure every frame is perfectly straight before a single nail goes in the wall. It’s especially helpful for frames with multiple hanging points and for getting that perfect gallery wall where every piece lines up.
    • COMPLETE 85-PIECE HARDWARE KIT. Includes 2 Single-Notch Precision Hangers, 24 self-tapping screws, picture hooks rated at 10, 20, and 30 lbs, 6 D-hooks, 8 ft of hanging wire, 20 nails, and a storage case to keep it all together. Invented in the USA.
    • PERFECT GIFT FOR EVERY OCCASION. Whether it’s weddings, housewarmings, graduations, or for the DIY enthusiast in your life, Go Hang It! is the must-have tool and gift for anyone who hangs pictures. It extends to fit everything from small photo frames to large wall art, so one kit handles a whole house worth of hanging.

    Hanging pictures seems easy.

    Until you’re standing six feet away from the wall saying:

    “Left.”

    Someone moves it.

    “No. Other left.”

    Move it again.

    “Up a little.”

    Eventually there’s one picture on the wall and enough holes behind it to suggest someone fired birdshot through the drywall.

    The Go Hang It! Pro Picture Hanging Kit is designed to make the measuring, marking and leveling process easier.

    Check out the Go Hang It! Pro →

    Instead of guessing where the hardware needs to land, you can actually position the picture and determine where the mounting points should go.

    Novel concept, I know.

    Dad Approved move:

    Use the tool.

    Use a level.

    Then stop touching it.

    There comes a point where adjusting a picture another sixteenth of an inch is no longer home improvement.

    It’s a condition.

    See the Go Hang It! Pro on Amazon →


    🏠 4. Make the Rug Stay Where You Put the Rug

    Sale
    GORILLA GRIP® Extra Long Rug Grippers for Hardwood Floor, 8 Pack Black Rectangular 8
    • Grip Design: the original Gorilla Grip grippers for hard floors help to keep your rugs in place and prevent corner and side curling; easy to apply to the underside of carpet corners and floors to help rugs stay in place and flat against the floor
    • No Curling on Corners or Sides: innovative design seamlessly attaches to the underside of rug corners to help prevent rugs from curling upwards away from the floor; grippers can be used under the straight sides of rugs as well
    • Extra Strong Dual Sided Grip: dual sided rug stickers stick to both the underside of your rug and the topside of your floor to seamlessly grip rugs to hardwood floor; the adhesive grips work on most hard floors
    • Removable and Reusable: removable and reusable rug grippers can be used time and time again; to reuse, simply wipe with a damp cloth and reapply to floor when dry; grippers leave no residue on floors
    • Low Profile, Flexible and Convenient Size: our unique thin and low-profile design is flexible and soft underfoot, gripper measures 8 inches by 6.5 inches, by 2 inches

    Some rugs apparently have travel ambitions.

    You straighten them.

    Walk away.

    Come back.

    The rug has begun migrating toward another room.

    The Rug Grippers are designed to help secure rug corners and reduce that constant sliding and curling.

    Check out the Rug Grippers →

    This is particularly useful for smaller rugs and runners that never seem interested in remaining exactly where you placed them.

    And besides being annoying, a rug that slides or has curled corners can become a tripping hazard.

    Dad Approved verdict:

    Your rug has one job.

    Be a rug.

    It doesn’t need mobility.

    See the Rug Grippers on Amazon →


    🧺 5. Clean the Part of the Dryer Everyone Forgets Exists

    Palksky Dryer Vent Cleaner Kit, 3Pcs Dryer Cleaner Tool – Flexible Drier Vent Cleaning Brush, Lint Trap Cleaner Clip, Drier Hose Attachment, Lint Remover Cleaning Tools
    • [Tailored for Clothes Dryers: Optimized Design for Safe, Efficient Vent Cleaning] Engineered specifically for clothes dryer vents, the Palksky dryer vent cleaner kit features flexible, lint-resistant brushes and rods that navigate tight bends and narrow ducts (common in residential dryers) without damaging fragile vent liners. Unlike generic cleaning tools, its size and bristle density are calibrated to dislodge stubborn lint buildup— a leading cause of dryer inefficiency and fire hazards— ensuring thorough cleaning where it matters most for appliance performance and home safety.
    • [Dual Cleaning Benefits: Boost Dryer Efficiency & Reduce Fire Risks] Regular use of the Palksky dryer vent cleaner kit eliminates lint clogs that trap heat, forcing dryers to work harder and extend cycle times. By restoring optimal airflow, it cuts energy costs by up to 30% (based on typical dryer usage) while reducing wear on internal components. Critically, it mitigates fire risks: the U.S. Fire Administration reports 2,900 dryer-related fires annually, 34% caused by lint buildup— making this dryer vent cleaner kit an essential safety investment for every household.
    • [Effortless to Use: No Professional Skills Required] Designed for DIY simplicity, the dryer vent cleaner kit includes step-by-step instructions and lightweight, ergonomic tools that require no prior experience. The flexible rods connect easily (no tools needed) to reach vents up to 15 feet long, while the non-slip handle ensures a secure grip during rotation. Even first-time users can complete a full vent cleaning in under 15 minutes, saving the cost of professional service
    • [Specialized Tool Functions: Targeted Lint Removal & Inspection] The dryer vent cleaner kit combines multiple purpose-built tools for comprehensive cleaning: Spiral Brushes: Aggressively dislodge lint from duct walls with their helical design, ensuring no residue is left behind. Flexible Rods: Bend at 90° angles to navigate elbow joints, a common lint trap area often missed by rigid tools.
    • [Multifunctional Design: Beyond Dryers— Clean Drain Pipes Too] Unlike single-use dryer vent tools, this dryer vent cleaner kit doubles as a drain cleaner for kitchen sinks, bathroom tubs, and shower drains. The spiral brushes and flexible rods effectively remove hair, soap scum, and debris from drain pipes (up to 2 inches in diameter), eliminating clogs without harsh chemicals. This dual functionality maximizes value, turning a single purchase into a solution for two common household maintenance needs.

    We clean the lint screen.

    Hopefully.

    But there’s more lint hiding farther down the dryer vent system.

    The Dryer Vent Cleaner Kit gives you a way to reach farther into areas that ordinary cleaning doesn’t.

    Check out the Dryer Vent Cleaner Kit →

    This is different from the other products on the list because it’s not really about convenience or appearance.

    It’s maintenance.

    Lint buildup can restrict airflow, hurt dryer performance, and contributes to dryer-fire risk. The U.S. Fire Administration specifically recommends cleaning the lint filter before and after each load and cleaning the back of the dryer where lint can build up.

    Dad Approved move:

    Put dryer maintenance on an actual schedule instead of waiting until towels require enough drying cycles to qualify for residency.

    And if you’re dealing with a long, inaccessible, damaged, or complicated dryer vent run, that’s a different animal. Don’t assume a little brush replaces proper inspection or professional cleaning when needed.

    See the Dryer Vent Cleaner Kit on Amazon →


    🪵 6. Make the Furniture Scratch Less Obvious

    Sale
    Furniture Repair Kit Wood Markers – Set of 13 – Markers and Wax Sticks with Sharpener Kit, for Stains, Scratches, Wood Floors, Tables, Desks, Carpenters, Bedposts, Touch Ups, and Cover Ups Six Colorway Kit 6+6 Chisel
    • PRODUCT DETAILS – This 13 piece kit includes 6 Repair Markers, 6 paper wrapped wax sticks and 1 wax stick sharpener packaged in a blister card.
    • 6 UNIQUE COLORS – Maple, Oak, Cherry, Walnut, Mahogany and Black to match the color of your furniture. Now there’s no need for you to call a professional to retouch your scuffed furniture. Become the pro yourself!
    • PREMIUM QUALITY – Top quality markers and wax sticks that cover scratches, nicks, scuffs, and discoloration on furniture, cabinets, tables, beds and more. 100% effective and permanent.
    • EASY TO USE – Simply draw over the scratch, allow it to quickly dry, and watch the scratches disappear right before your eyes! These are safe to use on all types of wooden furniture. Use the included sharpener to sharpen the wax sticks.

    You bought the table.

    It looked beautiful.

    Then life happened.

    Kids.

    Pets.

    Keys.

    Moving things.

    Somebody dragging something across the top despite being specifically told not to drag something across the top.

    Now there’s a scratch.

    The Furniture Repair Markers give you multiple wood-tone options for disguising scratches, scuffs and other small blemishes.

    Check out the Furniture Repair Markers →

    This isn’t furniture restoration.

    If your coffee table looks like it survived a bear attack, a marker isn’t bringing it back from the dead.

    But for small scratches and worn areas?

    That’s exactly the sort of cosmetic problem these are meant to address.

    Dad Approved move:

    Test the color somewhere inconspicuous first.

    Wood finishes can be surprisingly difficult to match, and turning one tiny scratch into a giant dark stripe would technically qualify as making progress in the wrong direction.

    See the Furniture Repair Markers on Amazon →


    📝 Go Find Your “I’ll Fix It Later” List

    Walk around the house.

    Not looking for renovations.

    Look for annoyances.

    The cabinet that’s too dark.

    The rug that moves.

    The picture you still haven’t hung.

    The drain that’s slowing down.

    The scratch you see every time sunlight hits the table.

    The maintenance job you’ve been ignoring.

    Those are usually the easiest wins.

    You don’t need a contractor.

    You don’t need a weekend.

    You don’t need twelve trips to the hardware store.

    Sometimes you need ten minutes and the right little tool.


    🔨 Fix One Thing Today

    Here’s the challenge.

    Don’t make another list.

    Pick one thing.

    Fix it.

    That’s it.

    Tomorrow you can tackle another.

    Because the strangest thing about little household problems is how long we’ll tolerate them.

    We’ll move the rug back into position 400 times before spending ten minutes solving the reason it keeps moving.

    We’ll use our phone flashlight in the same cabinet for three years.

    We’ll walk past the crooked picture so many times that eventually it starts looking straight.

    Small problems survive because they’re never important enough to become today’s problem.

    So make one today’s problem.

    Then cross it off.

    That tiny victory feels considerably better than saying:

    “I’ll get to it this weekend.”

    For the 37th weekend in a row.

    Person sitting amid clutter beneath a Project Organize: Day 4 sign
    Let’s not get this far.